Creating Video Clips
Overview
Brightcove Engage™ provides the ability to create video clips from live events that are in progress and completed live events. There are several reasons you might want to create a clip:
- To create a short, teaser clip that can be posted to social media
- To limit the length of a video that you want to post (most platforms limit the length of videos)
- You have found that shorter videos perform better on social media
Notes
- Clips can only be created within 7 days of the event end. Afterwards, the Create Clip button will be disabled.
- Clipping is not supported on all browsers.
- Clips will be frame-accurate provided that the encoder is sending SMPTE timecodes for the stream - otherwise, they will be accurate within a couple of frames. Note that to provide clips as quickly as possible, a segment-accurate clip is first created, and replaced by a frame-accurate clip as soon as it is available.
- Clips with a start time less than 10 seconds into the stream cannot be created.
- Media sharing will fail for videos created by clipping Live streams.
- Clips cannot be created from AES encrypted live streams.
Navigating the clip editor
To open the clip editor, click Live in the navigation header, click on an event name and then click Create Clip in the left navigation. The clip editor will open.
Note that all times in the clipping interface are based around the UTC time that the video data was received by Brightcove.

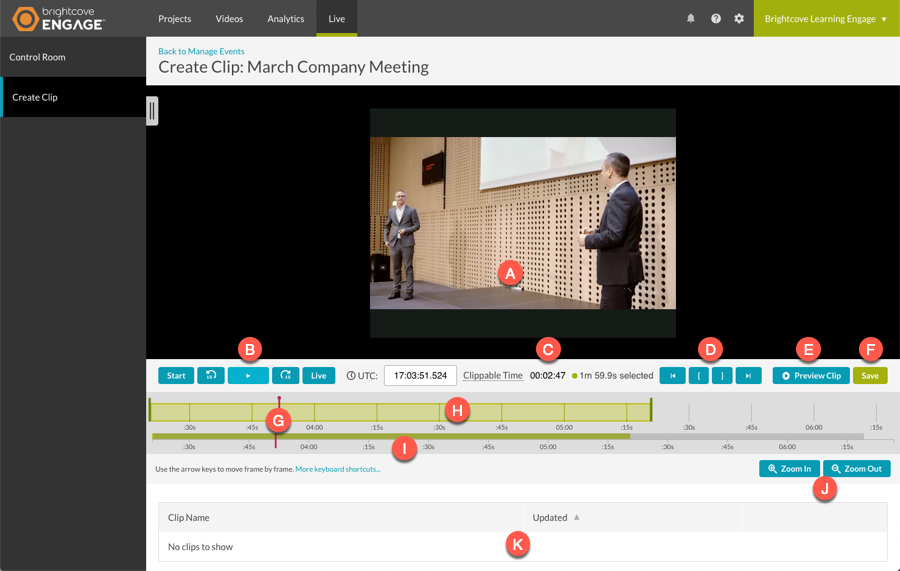
The clip editor is organized as follows:
- A - Preview player
- B - Playback control buttons
- C - Clip time
- D - Clipping buttons
- E - Preview clip button
- F - Save button
- G - Playhead
- H - Focus timeline
- I - Context timeline
- J - Zoom buttons
- K - List of clips
Creating a clip
Follow these steps to create a clip.
- Using the clipping buttons or shortcut keys, set the start and end points for the clip.

- Click Save.
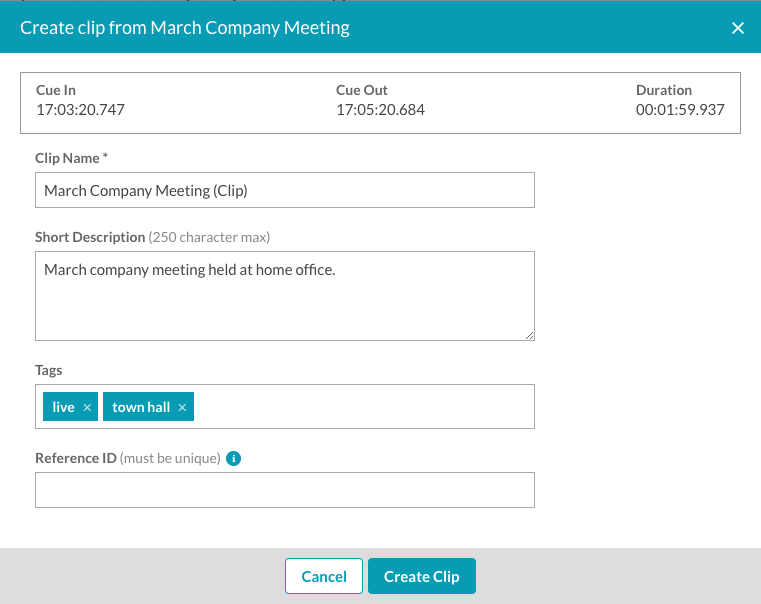
- Enter the clip video properties.
- Clip Name - Name of the clip
- Short Description - Description of the clip
- Tags - Tags to associate with the clip
- Reference ID - Reference ID to assign to the clip

Any required custom fields will also be displayed.
- Click Create Clip. The processing for the clip will begin.
A list of all clips will appear below the clip editor. Clicking the Clip Name will open the clip on the Videos page in another browser tab.
Preview player
The preview player is used to preview the clip. When the event is in progress and the clip editor is opened, the clip will begin to play from the "safe live point" which is approximately 3 segments before the end. Note that not all browsers support autoplay.
Playback control buttons
The playback control buttons are used to control to playback of the clip inside of the preview player.
| Button | Description |
|---|---|
 |
Starts video playback at the beginning of the source video |
 |
Jumps the playhead back 15 seconds |
 |
Starts video playback from the playhead position |
 |
Jumps the playhead forward 15 seconds |
 |
Jump to Live |
 |
Jump to end |
Clip time
The clip time displays the current UTC time for the playhead and the clippable time. Clicking on the UTC link will switch to the local time display.

Clipping buttons
The clipping buttons are used to clip the desired portion of the source video.
| Button | Description |
|---|---|
 |
Jumps to cue in point of the video |
 |
Sets the starting point of the clip. The start point can also be set by dragging the handle at the beginning of the focus timeline. |
 |
Sets the ending point of the clip. The end point can also be set by dragging the handle at the end of the focus timeline. |
 |
Jumps to the cue out point of the video |
The cue in and cue out points are the start and end of a clip. Each of these points is represented on the focus timeline with a draggable handle, and the time between the points is filled-in green. The points are also represented in the context timeline as the left and right edges of the green rectangle indicating the clip space.

Preview clip
Click the preview clip button to play the clip.

Playhead
The playhead is an indicator of where in time the player is playing. The playhead is represented in the focus timeline by a red line with a red circle on top and with a red vertical line in the context timeline.

On the focus timeline, the playhead may be dragged to scrub through the video. Double-clicking on the focus timeline will move the playhead to that point. The playhead can also be used to set cue in and cue out points using the cue-in/cue-out buttons or by using the keyboard shortcuts.
Focus timeline
The focus timeline is the top timeline in the interface.
The playhead is an indicator of where in time the player is playing. The playhead is represented in the focus timeline by a red line with a red circle on top.

Context timeline
The context timeline is the bottom timeline in the clip editor. The context timeline shows the entire duration of the video, regardless of zoom level, the selected area of the clip, the location of the playhead, and the current focus viewport. The timeline is indicated with a red line.

Zoom buttons
The zoom buttons are used to zoom in or out on the focus timeline.
| Button | Description |
|---|---|
 |
Zooms in the focus timeline. The focus viewport (white box) in the context timeline will show the area of the clip that is being displayed in the focus timeline. |
 |
Zooms out the focus timeline. The focus viewport (white box) in the context timeline will show the area of the clip that is being displayed in the focus timeline. |
List of clips
A list of clips will appear below the clip editor. Clicking the Clip Name will open the clip on the Videos page in another browser tab.
Keyboard shortcuts
Keyboard shortcuts can also be used to play and create a clip from the video. The following keyboard shortcuts are available.
Playback controls
| Press this key | To do this |
|---|---|
space, k, down |
Play / Pause |
I |
Go to cue-in |
O |
Go to cue-out |
p |
Play preview |
j, left |
Jump back 1 frame |
J, shift + left |
Jump 1 second back |
l, right |
Jump 1 frame forward |
L, shift + right |
Jump 1 second forward |
s |
Jump to start |
e |
Jump to end / live |
Timeline controls
| Press this key | To do this |
|---|---|
i |
Set cue-in |
o |
Set cue-out |
+ |
Zoom in |
- |
Zoom out |
u |
Pan timeline to playhead |
? |
Open help modal |

