


Creating and Managing Live Events
Introduction
The live video features in Brightcove Engage™ can be used to broadcast a live event to both Mobile App and Web experiences. After you create a live event, you will be provided with a set of encoder settings that you plug into your on-site encoder. All transcoding is done in the cloud so you don't need a hardware based transcoder. The live video can then be included when creating Mobile App and Web Experiences.
Prerequisites
Before you can broadcast a live event, the following items are required:
- A camera to broadcast the event
- You must have your own encoding software, for example Telestream's Wirecast or Open Broadcaster Software
Limitations
- Live broadcasts will experience a 20-30 second delay
- Streaming must begin within 30 minutes of the event start
- For users using Internet Explorer, version 10 or later is required
Managing live events
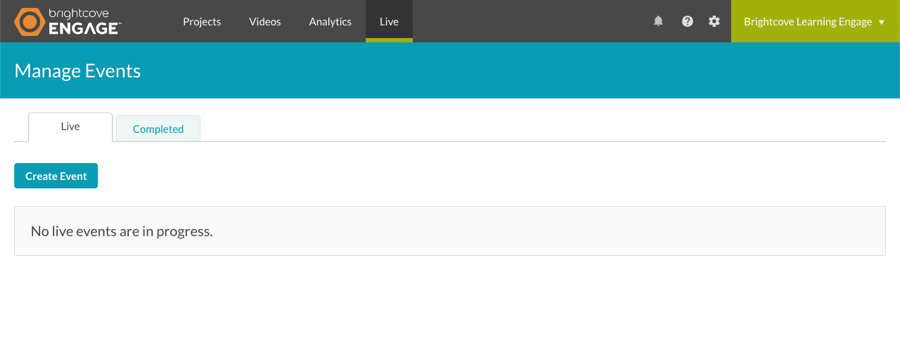
To get started with live events, login to Brightcove Engage™ and click Live in the navigation header. The Manage Events page displays two main tabs:
- Live - Lists live events that are in progress
- Completed - Lists completed events
The Show dropdown can be used to filter the events that appear on the Completed tab.
The body of the page will display a list of live events with related information:
- Job Status - Status of the live stream
- Processing - Stream is live
- Processing Error - The Live stream has encountered an error
- Standby - Stream ready to be activated (static entry points only)
- Stopping - The live stream is stopping and creating any associated VOD outputs
- Completed - Live stream has completed
- Cancelling - The live stream is stopping and will NOT process any pending VOD outputs
- Cancelled - The live stream has been cancelled
- Disconnected - The encoder has been disconnected
- Waiting - Waiting for the RTMP stream (encoder to start)
- Failed - The job has stopped as a result of a system error
- Abandoned - The event finished without an encoder being connected
- Completed date and time
- Event name and ID
- Total views
- Duration
- Created date and time (for recurring events only)
To view the live event video properties, click on the event name to open the Control Room.
Creating a new event
To create a new live event, follow these steps.
- From the Manage Events page click Create Event. The Create Live Event page will open.
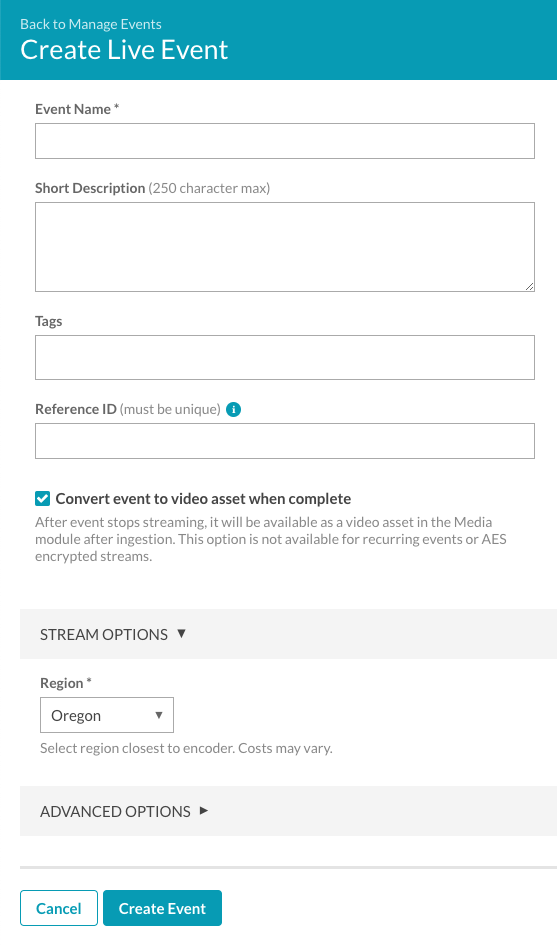
- Enter the event details:
- Event Name - Name for the event; this name will also appear in the Videos page if the video is saved as a video asset (max 255 characters)
- Short Description - Description of the event (max 250 characters)
- Tags - Tags to associate with the event; tags will be assigned to the video if the video is saved as a video asset (max 128 characters and 1200 tags)
- Reference ID - Reference ID for the event; must be unique (max 150 characters)
- Select Convert event to video asset when complete to save a video on demand version of the live video to your account. Note that the VOD version is not available as soon as the live event ends, the video will be available once the upload processing is complete.
- In the STREAM OPTIONS section, select a Region. The Region is the Amazon Web Services (AWS) region to use. To reduce latency, you should select the region that is closest to where your encoder is located. By default, the region is set to Oregon which will produce bad results if you are streaming from another continent. The following regions are supported:
- Oregon (default)
- Virginia
- Tokyo
- Singapore
- Sydney
- Mumbai
- Frankfurt
- Ireland
- Click ADVANCED OPTIONS and configure the advanced options.
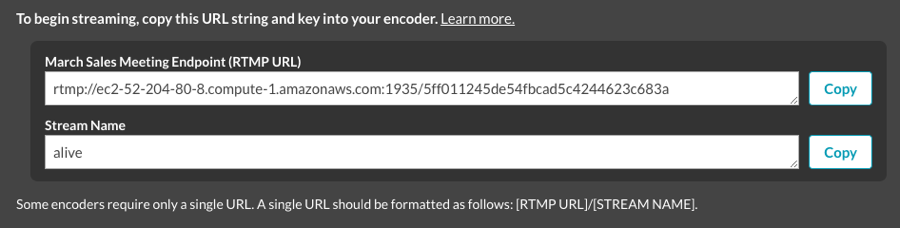
- Click Create Event to start the live event. The Control Room page will open with details about the live event including the Streaming Endpoint (RTMP URL) and Stream Name which will be used by your encoder.
By default, the encoder must be started within 30 minutes from when a new event is created.
Click the Stop Streaming button to end the event.
Configuring advanced options
When creating a new event, advanced options can be configured. To configure the advanced options, click the ADVANCED OPTIONS link when creating the event.
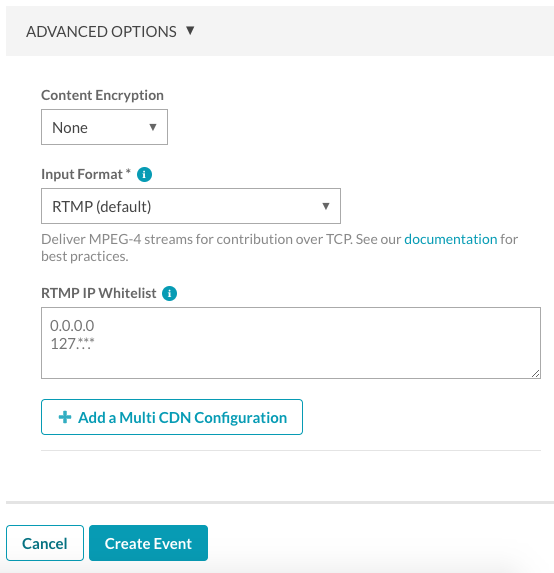
The following options can be configured:
- Content Encryption - Select the type of encryption to apply to the live stream:
- None - No encryption is applied
- AES-128 - Secure the stream using AES-128 encryption. If this option is selected, you must enter your Encryption Key. The key must be 32 hexadecimal characters. For best results, use a key generator, choosing the
128-bitandHexoptions.
- Input Format - The input format from the encoder that will be sent to Brightcove Live. This feature enables additional metadata in a live stream like now, now-next, more flexibility in subtitles and captioning, audio tracks and enables streamlined digital experiences with standard broadcast level data. The following input formats are supported:
- RTMP (default)
- Real-Time Transport Protocol (RTP)
- Secure Reliable Transport (SRT)
- RTMP IP whitelist - Enter a set of IP addresses that are allowed to connect to the RTMP endpoint. This controls who can connect to the RTMP endpoint. Note this option will only appear if the Input Format is RTMP.
- CIDR Whitelist - Enter a set of IP addresses that are allowed to connect to the RTP or SRT endpoint. This controls who can connect to the RTP or SRT endpoints. Note this option will only appear if the Input Format is RTP or SRT.
- + Add multi CDN configuration - Enter a label and URL for additional CDNs. This is a whitelist of CDNs that are allowed to ask our primary CDN for the video segments. You are responsible for configuring the secondary CDN correctly.
Viewing live event info using the Control Room
The Control Room page is used to view information about a live event. When you create a new live event and streaming begins, the Control Room page will open displaying the event information. For information on using the Control Room, see Viewing Live Event Info Using the Control Room.
Duplicating an event
Duplicating an event makes it easy to create another event with the same settings that were used to create a prior live event. To duplicate an event, follow these steps:
- Click on an event to open the Control Room page.
- Click Duplicate Event at the top of the page. A new live event will be created using the settings from the prior live event. Make changes to the event properties as needed.
- Click Create Event.
Creating a clip
Clips can be created while the event is in progress or after the event has ended. If clips can't be created, a message will appear when hovering over Create Clip in the left navigation. For information on creating a clip, see Creating Video Clips.
Troubleshooting live stream issues
If you need further help getting your live event to work, you can contact us. To make sure you get the fastest response possible, below is a list of what support will need to solve the problem.
- The specific symptoms the stream is having. For example, does it not play at all or does it stutter or freeze?
- Whether this stream worked correctly in the past
- The entry point URL you are using in your encoder
- The encoding software and hardware are you using
- The video ID of your live asset in Brightcove Engage™
- The results of a trace-route from your encoder to the publishing point host