In this topic you will learn how to configure custom domains and SSL for a Web Experience.
When you first create a Web Experience, it is assigned a random domain with the format of <site-slug>.bcvp0rtal.com . For example, http://site-148393.bcvp0rtal.com. When the experience is published, viewers will be able to access the site at this domain. Brightcove Engage provides the ability to publish Web Experiences at a Brightcove provided domain or at your own custom domain.
Web Experiences can also be assigned to multiple URLs allowing publishers to use the same site for different functions without having to duplicate the site. For example, if you have a video site you want to use in a campaign and as your main video portal, you can brand different URLs and assign them all to the same site. No site duplication is needed and you can easily delete URLs when they are no longer needed.
Using a Brightcove provided domain
Brightcove provided domains allow you to quickly and easily create a domain for your Web Experience without having to work with your IT department to create a custom CNAME or register a new domain name with a registrar. They’re available "out of the box" and can be implemented with a click of a button. The available domains are:
brightcoveengage.video
bcvp0rtal.com (which is assigned to Web Experiences by default)
All of them support SSL. To access the SSL site, just add https to the URL. For example, https://mysite.brightcoveengage.video
Using a custom domain (publisher registered)
Web Experiences can also be hosted on your own custom domain that you register. This allows you to brand the URL and keep it consistent with your current website/URL naming construct. This requires you to register the domain name and then configure a custom CNAME record with your hosting provider. See the section below for information on how to configure a CNAME record.
Creating a custom domain
To create a custom domain, follow these steps:
Open Brightcove Engage.
Open the Projects page and click the Settings link at the top of the page
In the left navigation, click the Custom Domains and SSL link.
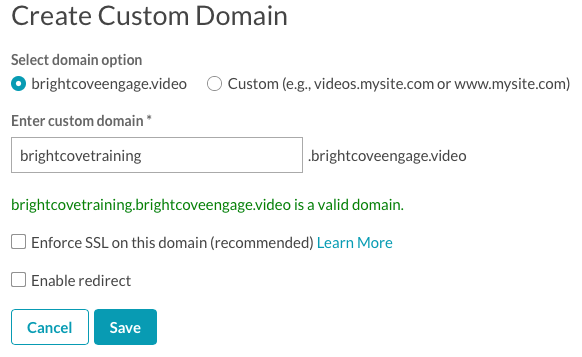
Click Create Custom Domain.
Select a domain option to use:
brightcoveengage.video - The site domain will have the format <your domain>.brightcoveengage.video.
Enter the domain name. A message will be displayed to indicate if the domain is valid or invalid. If the domain name is invalid, enter a new domain name.
If you are publishing the site using a Brightcove provided domain, there is an option to Enforce SSL on this domain. Check Enforce SSL on this domain to enable a redirect from the non-SSL version of the site if a viewer goes to it.
If you are publishing the site to your own custom domain, you have the option of securing the site using SSL. Check the Use SSL checkbox to secure the site using SSL. For information on using SSL, see Securing a Web Experience with SSL.
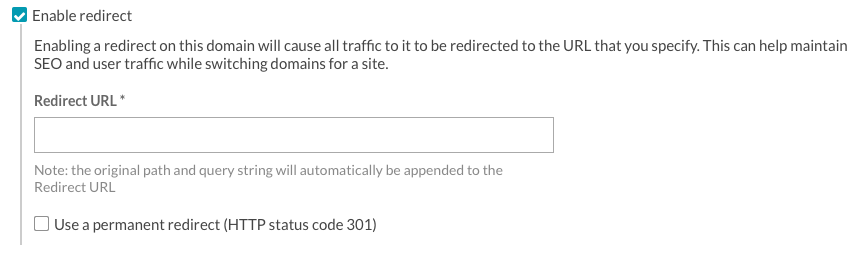
Check Enable redirect to redirect this URL to another URL. Typically this would only be checked after this domain has been used for a while. When this option is selected, enter the Redirect URL this existing URL should be redirected to.
Check Use a permanent redirect (HTTP status code 301) to indicate that the redirect is permanent. When a search engine spider finds a 301 status code in the response header of a web page, it understands that this web page no longer exists and replaces the indexed URL with the new one. This option will retain your old web page traffic and page rank.
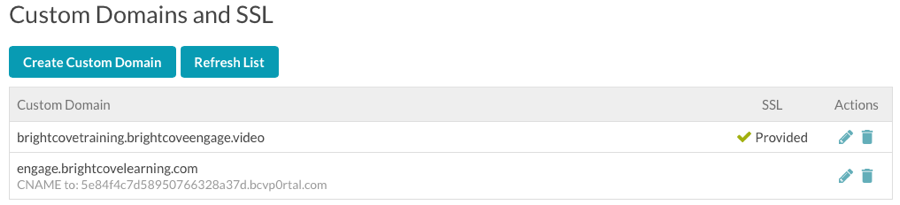
Click Save. A list of configured domains will be displayed.
Create additional domains as needed.
To edit or delete a domain, click the edit () or delete () buttons.
Once custom domains have been created, they can be assigned to an experience as part of the experience properties. For information, see Assigning a Custom Domain to a Web Experience.
Configuring CNAME records with your hosting provider
The steps to configure a CNAME (Canonical Name) record will differ based upon your hosting provider. You need to configure a CNAME record for each custom domain you will be using. If your site is configured to use SSL, the CNAME record will point to a CloudFront URL. See Securing a Web Experience with SSL for information. Note that custom domains must include a subdomain in order to be configured as a CNAME ex: engage must be placed before brightcovelearning.com so I can configure my CNAME.
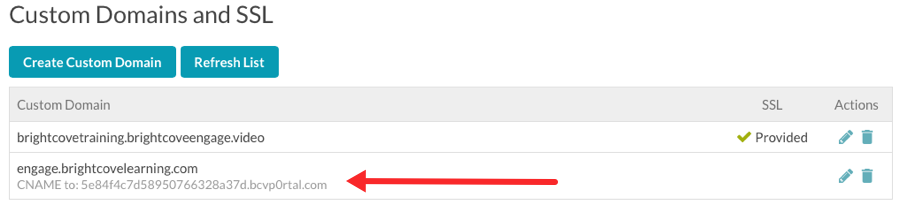
The CNAME value is displayed as part of the Custom Domains & SSL settings.
In this example, for the custom domain of engage.brightcovelearning.com, I would add a CNAME record and add a host of engage and point it to 5e84f4c7d58950766328a37d.bcvp0rtal.com.
You may need to contact your network administrator or web hosting provider for help with this step. Remember that it can take up to 48 hours for DNS changes to take effect.
Securing sites with SSL
There are two options for securing a Portal Experience with SSL:
For sites that are being published using the assigned site slug (i.e. <site-slug>.bcvp0rtal.com) or are using a Brightcove supplied domain (<site>.brightcoveengage.video), no configuration is needed to support https. Adding https:// to the beginning of the URL will secure the data transmission between your browser and the experience. You can also select Enforce SSL on this domain (recommended) to enable a redirect from the non-SSL version of the site if a viewer goes to it.
For sites that are hosted on a custom domain, check the Use SSL option when entering your domain name. You will then be prompted to enter your certificate information. For more information, see Securing a Web Experience with SSL.